Showing posts with label dress. Show all posts

Sunday, August 18, 2013

Create 365 - Day 191 & 192

Okay, lots of stops and starts this past week. I have also just started studying for what hopefully will be a new (additional) career. Unfortunately, since I've been trying to figure out what works best in getting both studying and sewing done, I have only finished two days worth of 365-worthy stuff. The good news is that I think I've figured out how not to exhaust or stress myself out doing both.

Anywho, now for the good stuff. This cutie pie was a test doll to work out the kinks of what I have in mine for my gaggle of nieces this Christmas. I customized it to my taste since I'm keeping it. Here is my 13" tall Cutie Vamp Doll.

The ones for my nieces will not have fangs or bat dresses but you get the idea. The next ones will be twice as large, and will be fleece where this one is felt for the most part. They'll also be all machine stitched except for detailed bits. I'd never finish if I had to sew them all by hand!

This is counting as two days because the doll body was done one day and the dress was redrafted and sewn the next available stitchy day.

Well, time for me to get studying! Yay?

xx ~Static

Friday, March 25, 2011

MrsEvils' Me Equivoque Contigo Dress - Pt 4

Hurray! The dress is done! Well it was done a while ago but my digicam batteries refuse to hold a charge for long so every time I was ready to take pics of course the batteries were dead. Plus, we're in the midst of closing on our first house evah! Squee! Needless to say, I've been just a wee bit distracted :D

Okay, okay, the dress. Right. Here are the last few "in progress" pics. Since I'm loading up on the pics in this post I'll keep them small yet clickable. So click away for a closer look!


L to R: 1) Hem, hem & more hem. 2) The delish Satin lining is hand stitched at the 14" back zipper. Interior satin loops make the straps removable. 3) Close up of adjustable/removable strap.

And, what we've all been waiting for... the finished dress!!

MrsEvils even now has a matching headband that can reverse to solid black. Ooh, ahh, ooh. You know you want one too. Don't lie ;D

I'll be dealing with the real world for the next couple weeks but hopefully I'll be able to post more often after all is done. Now it's back to packing for me!

xx ~Static

Sunday, February 6, 2011

MrsEvils' Me Equivoque Contigo Dress - Pt 3

The outer shell is done and the lining is cut. I freehand placed the velvet ribbon, made sure both sides lined up & hand stitched the bow for the front, ain't it perty?

MrsEvils-InProgress5 MrsEvils-InProgress6

The zipper has been conquered. Straps are done, which are now adjustable and removable. Pesky satin lining, I forgot how many pins you need to use to keep it stable. It's a great shade of red though!

Now if only I could stop getting distracted by shiny things & banana bread.

Hmm, what? Oh yes, the next pics will be of it all done. Callooh callay!

Saturday, January 15, 2011

MrsEvils' Me Equivoque Contigo Dress - Pt 2

So, after making all my adjustments to the pattern (MrsEvils' Me Equivoque Contigo Dress - Pt 1 can be found here) I decided to change the casing on the boning. For one, plastic boning typically comes in bulky white casing. "But, Static", you ask, "it's on the inside so who will know?" Me, that's who!

I decided to use single fold black bias tape instead since it will be sandwiched between the outer cotton fabric and satin lining. Stable enough without all the bulk. Excellent. There is a little trick to it though. Cut the black bias tape in the lengths directed in the pattern. On one end, only, of each piece mark 3/8" up from the end and stitch straight across. Put the casings aside for later. You won't put the boning in the casings until after the casings are sew in place as directed in the pattern.

Oh, and if the plastic boning is curling up on you iron it to flatten it out. Use a low heat (my iron was on 1), you don't want to melt it. Place it on your ironing surface so that the curve of the plastic boning is bulging up toward you. Place the iron at center, while holding one end up so your bending that pesky curve in the opposite direction, then pull.Yes, pull the boning upward from under the flat iron. Do this a couple times until it straightens enough and then repeat for the other end. Remember to lift your iron occasionally so you don't burn your ironing surface! Just another reason to have your iron on LOW.

MrsEvils-InProgress3

Hopefully the above tips haven't bored you to tears. For being so wonderful here's a sneak peek of the dress! I've cut all the pieces and pinned them to my dressform to double check that they line up the way that I wanted.

MrsEvils-InProgress1 MrsEvils-InProgress2

The pieces are just overlapped without the seam allowance tucked in. The top edge will drop a bit and the hem will come up 1.25". Time to cut the gorgeous red lining then sewing! Hurray!

Pt 3, coming soon...

Thursday, January 13, 2011

MrsEvils' Me Equivoque Contigo Dress - Pt 1

~or~ How to turn McCall's 4450 pattern into an asymmetrical (short in front long in back) dress!

This is the first time I've drafted an asymmetrical dress. Mind you, I understand the concept. But knowing and doing are different dragons. So I hunted the interwebs for drafting tips but I could only find a couple of mentions of dresses with trains, which while close don't quite have the shape I was looking for, and the odd lopsided skirt. So dusting off the drafting knowledge I've squirreled away in my brain I just went with what looked right to me.

Keep in mind MrsEvils is adorably pocket-sized. Okay, MrsEvils is not all that much smaller than me but she is adorable. How could you not want to put her in your pocket? Alright I better stop before she kicks my butt ;D

I sent her here a rainbow of color options but she decided on red lining to go with the awesome fabric she sent me. Red. Deliciously bloody red. Ahem, err, excuse me. Here's the red color mockup:
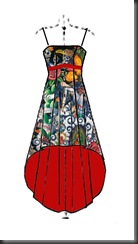
MrsEvilsDress-ColorMockup-FINAL

There were a few tweaks to the M4450 pattern but I'm going to focus on the asymmetrical skirt portion here.

4450Pattern1

Before you ask, the pattern  pieces might look odd because 1) I don't reinvent the wheel when I'm surrounded by mounds and mounds of collected patterns and 2) I snip & tape back the edges so I can use the patterns other sizes. Sneaky me. And the crappy pics are because they were quick snaps as I was working in the wee hours of the night. I was busy, okay? Jeez. Anywho, for quick reference, since I'm going into seamstrix mode here in a sec: CF = center front, CB = center back, SS = side seam, WL = waistline, hem edge =  finished hem + 1.25" hem

Starting with the CF piece I measured down from the waistline and made a perpendicular line (pink chalk line) where the new hem edge was going to be.
4450Pattern2
Then I went to the CB piece. At the center back seam I marked a perpendicular line across the bottom of the pattern at the level of the new back hem edge.
4450Pattern3
Now to get the angled line between the two I subtracted the finished hem length of CF from CB. This is now my SS length.
Of course the one time I need seam allowance marks they're not on the pattern. Figures. So I marked the 5/8" seam allowance, between waist and hem, on all pieces and then pinned them together.
Next, at the SS, I measured down from the WL and made a small mark for the new SS hem edge.
On the new CF hem edge line I made a mark about 6" from the CF. Using a big metal ruler, I connected that mark to the SS mark and then continued the line until it hit the horizontal line I drew on the CB piece.
Now what to do with this big old zigzag? I use a varied form curve (like a french curve but a lot bigger) to smooth out the zig on the CF piece. Easy. The trickier part is the zag on the CB piece. For the CB I just used my elbow as a fixed point and swung my hand back and forth to lightly chalk a curve inside the zag (my old drafting teacher is probably having heart palpitations right now). I used my varied form curve to make sure it connected smoothly and drew the line in stronger using the varied form curve as a guide.
4450Pattern4
I briefly pinned it to my dressform to double check that I liked the shaped of the new hem, the pink chalk made it easy to see whether looking at the right or wrong side of the pattern. Yup, good. Time to cut! I'm hopeful that I'll need the pieces that I cut away so I was sure to write on each as to what pattern piece they corresponded to so I could always tape them back in place.
4450Pattern5 
I made sure to get ALL of the pins out of the pattern pieces, gave them a quick press and...

To be continued!

Friday, December 12, 2008

Winter Wondrous!

So on the night of our first snow I finally finished my niece's holiday dress.

This is the first time I've done a dress like this and on such a small scale (3T) so of course I went all out. The dress is Silk, the Sash & custom made trim is Satin Brocade and the lining is Satin. To top it all off the hem, lining & casing were all stitched by hand! I'm insane, I know, but I think it was all worth it. I can't wait to have pics of her wearing it!


See, Sis? Not everything I make is black!! :p

Blog Widget by LinkWithin