Whether your purse strings are strained or you just want some nice tablecloths without spending an arm and a leg at local chain store, and have some time to spare, here's a way to do it!
I made these for my very low budget, non-traditional wedding reception and they were an absolute hit. 2 in Sage Green, 2 in Ivory. With different colors sheets and trim you could make festive tablecloths for every season or holiday!

Did you know a full sized flat sheet fits a banquet sized table (4-6 seats) with a little adjustment? I did after a bit of math!
♦♦♦♦ ♦♦♦♦ ♦♦♦♦ ♦♦♦♦
Ingredients for 1 tablecloth:
♦ 1 Full sized Flat sheets from Wallyworld (*boo hiss* I know but as cheap as $3 each in-store), Tarjay, local Good Will, FreeCycle (free!), etc
♦ approx 10.25 yds* of Trim** for 1 tablecloth
♦ Seam ripper ~or~ tiny scissors, a needle & much patience
♦ A spool of black thread ~or~ whatever color matches the edges of your chosen trim
♦ Sewing machine
[*To get a more accurate measurement add the length & width of you fabric x 2 /36 = approx how many yards you need. Be sure to round up to the 1/4 yard for overlap and matching pattern! Ex: my flat sheets 81"W + 102"L x2 /36 = 10.17yds, rounded up to 10.25yds of trim per sheet. You'd rather have too much than not enough!
**I got my Celtic Trim from Cheeptrims.com. There is a min order of $60, I ordered other needed supplies at the same time to meet the min.]
♦♦♦♦ ♦♦♦♦ ♦♦♦♦ ♦♦♦♦
Start by finding the wide hemmed end of the sheet, the end that would be up by the pillows if you were putting it on your bed. Using a seam ripper take out all the stitches that hold down this fold. Press out the long crease across the sheet, leaving the edges alone. Lots of pressing is key. It gives you nice crisp edges, sharp corners and a professional look!
Now you have some raw edges at one end of your sheet (about 12" on either side and one end completely). You will want to copy the rolled hem that is on the rest of the sheet. That's why you don't press out the edges right away so you can use it as a guide. Don't worry about the color of the thread here you will not see the stitches once the trim is added.
How to roll hem on the final, short end: Fold over the edge 1/4", press, fold over again, press, and then sew a row of stitches down the middle.
I suggest washing the sheets at this point so if there is any shrinkage or extra dye to get out of them now is the time so you don't get wonky looking trim later on. Dry and iron if necessary.
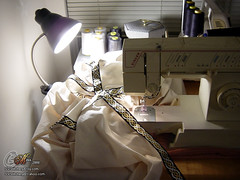
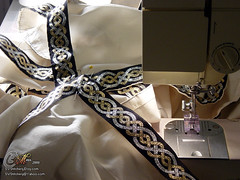
Now it is time to add the trim! I prefer the look of miter corners because I'm, well... a tad perfectionist. I even made the pattern match if you look real close. But you can overlap the corners at 90 degree angles, etc. Whatever is easiest for you!
(It helps to have more table space than I do also^^)
This part is an easy straight stitch. Line up your trim with the edge of your fabric. Use as many pins as you need. Top stitch all of the outside edge first, do your best to stay about 1/8" inside from the edge of you trim, then the inside edges.
Press on the wrong side of the fabric so you don't damage your trim and voila! You're done.
©2008 Maya/Static White/Static White's Stitchery
Link back to this to your heart's content but please do not copy and paste my content! I worked hard to put this together. Give credit where credit is due.










0 comments:
Post a Comment