~or~ How to turn McCall's 4450 pattern into an asymmetrical (short in front long in back) dress!
This is the first time I've drafted an asymmetrical dress. Mind you, I understand the concept. But knowing and doing are different dragons. So I hunted the interwebs for drafting tips but I could only find a couple of mentions of dresses with trains, which while close don't quite have the shape I was looking for, and the odd lopsided skirt. So dusting off the drafting knowledge I've squirreled away in my brain I just went with what looked right to me.
Keep in mind MrsEvils is adorably pocket-sized. Okay, MrsEvils is not all that much smaller than me but she is adorable. How could you not want to put her in your pocket? Alright I better stop before she kicks my butt ;D
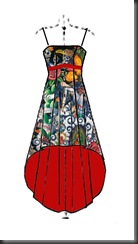
I sent her here a rainbow of color options but she decided on red lining to go with the awesome fabric she sent me. Red. Deliciously bloody red. Ahem, err, excuse me. Here's the red color mockup:
There were a few tweaks to the M4450 pattern but I'm going to focus on the asymmetrical skirt portion here.

Before you ask, the pattern pieces might look odd because 1) I don't reinvent the wheel when I'm surrounded by mounds and mounds of collected patterns and 2) I snip & tape back the edges so I can use the patterns other sizes. Sneaky me. And the crappy pics are because they were quick snaps as I was working in the wee hours of the night. I was busy, okay? Jeez. Anywho, for quick reference, since I'm going into seamstrix mode here in a sec: CF = center front, CB = center back, SS = side seam, WL = waistline, hem edge = finished hem + 1.25" hem
Starting with the CF piece I measured down from the waistline and made a perpendicular line (pink chalk line) where the new hem edge was going to be.

Then I went to the CB piece. At the center back seam I marked a perpendicular line across the bottom of the pattern at the level of the new back hem edge.

Now to get the angled line between the two I subtracted the finished hem length of CF from CB. This is now my SS length.
Of course the one time I need seam allowance marks they're not on the pattern. Figures. So I marked the 5/8" seam allowance, between waist and hem, on all pieces and then pinned them together.
Next, at the SS, I measured down from the WL and made a small mark for the new SS hem edge.
On the new CF hem edge line I made a mark about 6" from the CF. Using a big metal ruler, I connected that mark to the SS mark and then continued the line until it hit the horizontal line I drew on the CB piece.
Now what to do with this big old zigzag? I use a varied form curve (like a french curve but a lot bigger) to smooth out the zig on the CF piece. Easy. The trickier part is the zag on the CB piece. For the CB I just used my elbow as a fixed point and swung my hand back and forth to lightly chalk a curve inside the zag (my old drafting teacher is probably having heart palpitations right now). I used my varied form curve to make sure it connected smoothly and drew the line in stronger using the varied form curve as a guide.

I briefly pinned it to my dressform to double check that I liked the shaped of the new hem, the pink chalk made it easy to see whether looking at the right or wrong side of the pattern. Yup, good. Time to cut! I'm hopeful that I'll need the pieces that I cut away so I was sure to write on each as to what pattern piece they corresponded to so I could always tape them back in place.

I made sure to get ALL of the pins out of the pattern pieces, gave them a quick press and...
To be continued!