Showing posts with label pattern. Show all posts

Thursday, June 6, 2013

Create 365 - Day 143 to 147

I haven't been able to post daily, obviously, but I'm still going with my 365! Here are the latest additions...

Day 143
Here's the finished draft of the Bodice Front of the base pattern pieces I've been working on for myself. I forgot how involved this part was! I even started over at one point instead of backtracking a mistake. Whew! I was a bit rusty but I got my groove back.

Day 144
Here are some Circle Skirt drafts. They could be used as two different sized skirts but together they are the front and back for a 50s style swing dress.

Day 145
Circle skirt! Peachy, isn't it? I couldn't resist. I need more fun circle skirts in my wardrobe. They're very versatile, casual or dressy depending on what you wear them with, and just plain cute.
I tried to snap a pic of me wearing it but the lighting was horrible. Maybe another time. Seeing it on a hanger just doesn't do it justice.

Day 146 & 147
Two more Grumpy Nekos for the lovers of grumpy cats everywhere.

xx ~Static

Monday, October 22, 2012

Undead Mustang

Please tell me your week has started off better than mine...
Our beat up old car died in the driveway this morning.

UndeadMustang

Please help bring her back to life and use this coupon code, or share it with your friends!

UNDEADMUSTANG20

Good in either one of my shops...

http://SWStitchery.etsy.com
The code is good on everything, sale and custom listings included.
http://StaticWhite.etsy.com
Once the items here are gone, they're gone.

Expires: Oct 29th 2012

Note: I can not guarantee delivery for Halloween at this point, but, USPS 1st class usually takes 3-5 days within the US. So the sooner you order the better!

I seriously have no idea what this latest problem is going to cost us yet but all I can do is hope I can raise enough with my stitchings because we really have nothing to spare. Unfortunately, where we live we need the car, there's just no getting around it. So even if you, yourself, don't use the coupon code please share it with your friends!

Much appreciation, xx ~Static

Wednesday, September 7, 2011

I Can Haz Brainz?

My first PDF pattern ever, Zombie Hand Puppet, is now available. I'm so happy to finally have this done I could *squee*! Okay, maybe I did *squee* just a little because it took me almost 2 years before I completed it. Crazy I know but when you get distracted by other more demanding projects, life and shiny things, well, I'm sure you understand.

ZombieHandPuppet-Listing1

The Zombie Hand Puppet PDF pattern is available in my supply shop. If you don't see the listing just convo me and I'll get one up there for you asap.

Big huge thanks to SkeletalDropkick for her great help & insight! You need to check out her amazing wares. Really, you do.

xx ~Static

Saturday, January 15, 2011

MrsEvils' Me Equivoque Contigo Dress - Pt 2

So, after making all my adjustments to the pattern (MrsEvils' Me Equivoque Contigo Dress - Pt 1 can be found here) I decided to change the casing on the boning. For one, plastic boning typically comes in bulky white casing. "But, Static", you ask, "it's on the inside so who will know?" Me, that's who!

I decided to use single fold black bias tape instead since it will be sandwiched between the outer cotton fabric and satin lining. Stable enough without all the bulk. Excellent. There is a little trick to it though. Cut the black bias tape in the lengths directed in the pattern. On one end, only, of each piece mark 3/8" up from the end and stitch straight across. Put the casings aside for later. You won't put the boning in the casings until after the casings are sew in place as directed in the pattern.

Oh, and if the plastic boning is curling up on you iron it to flatten it out. Use a low heat (my iron was on 1), you don't want to melt it. Place it on your ironing surface so that the curve of the plastic boning is bulging up toward you. Place the iron at center, while holding one end up so your bending that pesky curve in the opposite direction, then pull.Yes, pull the boning upward from under the flat iron. Do this a couple times until it straightens enough and then repeat for the other end. Remember to lift your iron occasionally so you don't burn your ironing surface! Just another reason to have your iron on LOW.

MrsEvils-InProgress3

Hopefully the above tips haven't bored you to tears. For being so wonderful here's a sneak peek of the dress! I've cut all the pieces and pinned them to my dressform to double check that they line up the way that I wanted.

MrsEvils-InProgress1 MrsEvils-InProgress2

The pieces are just overlapped without the seam allowance tucked in. The top edge will drop a bit and the hem will come up 1.25". Time to cut the gorgeous red lining then sewing! Hurray!

Pt 3, coming soon...

Thursday, January 13, 2011

MrsEvils' Me Equivoque Contigo Dress - Pt 1

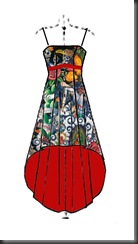
~or~ How to turn McCall's 4450 pattern into an asymmetrical (short in front long in back) dress!

This is the first time I've drafted an asymmetrical dress. Mind you, I understand the concept. But knowing and doing are different dragons. So I hunted the interwebs for drafting tips but I could only find a couple of mentions of dresses with trains, which while close don't quite have the shape I was looking for, and the odd lopsided skirt. So dusting off the drafting knowledge I've squirreled away in my brain I just went with what looked right to me.

Keep in mind MrsEvils is adorably pocket-sized. Okay, MrsEvils is not all that much smaller than me but she is adorable. How could you not want to put her in your pocket? Alright I better stop before she kicks my butt ;D

I sent her here a rainbow of color options but she decided on red lining to go with the awesome fabric she sent me. Red. Deliciously bloody red. Ahem, err, excuse me. Here's the red color mockup:
MrsEvilsDress-ColorMockup-FINAL

There were a few tweaks to the M4450 pattern but I'm going to focus on the asymmetrical skirt portion here.

4450Pattern1

Before you ask, the pattern  pieces might look odd because 1) I don't reinvent the wheel when I'm surrounded by mounds and mounds of collected patterns and 2) I snip & tape back the edges so I can use the patterns other sizes. Sneaky me. And the crappy pics are because they were quick snaps as I was working in the wee hours of the night. I was busy, okay? Jeez. Anywho, for quick reference, since I'm going into seamstrix mode here in a sec: CF = center front, CB = center back, SS = side seam, WL = waistline, hem edge =  finished hem + 1.25" hem

Starting with the CF piece I measured down from the waistline and made a perpendicular line (pink chalk line) where the new hem edge was going to be.
4450Pattern2
Then I went to the CB piece. At the center back seam I marked a perpendicular line across the bottom of the pattern at the level of the new back hem edge.
4450Pattern3
Now to get the angled line between the two I subtracted the finished hem length of CF from CB. This is now my SS length.
Of course the one time I need seam allowance marks they're not on the pattern. Figures. So I marked the 5/8" seam allowance, between waist and hem, on all pieces and then pinned them together.
Next, at the SS, I measured down from the WL and made a small mark for the new SS hem edge.
On the new CF hem edge line I made a mark about 6" from the CF. Using a big metal ruler, I connected that mark to the SS mark and then continued the line until it hit the horizontal line I drew on the CB piece.
Now what to do with this big old zigzag? I use a varied form curve (like a french curve but a lot bigger) to smooth out the zig on the CF piece. Easy. The trickier part is the zag on the CB piece. For the CB I just used my elbow as a fixed point and swung my hand back and forth to lightly chalk a curve inside the zag (my old drafting teacher is probably having heart palpitations right now). I used my varied form curve to make sure it connected smoothly and drew the line in stronger using the varied form curve as a guide.
4450Pattern4
I briefly pinned it to my dressform to double check that I liked the shaped of the new hem, the pink chalk made it easy to see whether looking at the right or wrong side of the pattern. Yup, good. Time to cut! I'm hopeful that I'll need the pieces that I cut away so I was sure to write on each as to what pattern piece they corresponded to so I could always tape them back in place.
4450Pattern5 
I made sure to get ALL of the pins out of the pattern pieces, gave them a quick press and...

To be continued!

Thursday, October 29, 2009

Lolita Outfit, Secrets of the

So in answer to Yve's query of "Did you make this up out of your head or did you have a pattern?"

Short answer? No, yes and then some. Long answer...

I was shown a pic of a Gothic Lolita outfit and asked if I could make something similar. After  a bit of hemming and hawing I said yes. I mean I went to school for this sort of thing! Which my husband was so kind to point out "that was like 15 years ago". Shush. So anyway! I am a pattern & book fiend so anytime I need a refresher I can bust out any amount of reference from the overflowing tubs in my closet or pull something off my shelves.

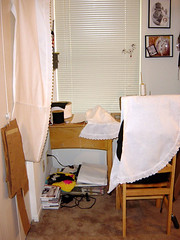
I two-third to three-quarter drafted the pattern which you can seen in the left of this image hanging from the door.

Workroom In White Lace by swstitchery

Rather than start from absolute scratch (which I can do but why reinvent the wheel?) I made a copy of  a Butterick pattern's (4154) basic princess line bodice and graded it down a couple sizes since the gal this is for is pixie sized. I then added the double breasted extensions to the front, redrafted the collar, drafted the gathered tail for the bodice, added 10 loops to the the back for lacing.

And we can't forget that the bodice has 14 buttons (only 7 buttonholes though, 2 sneaky snaps underneath), has a massively gathered tail, full lining, tailored sleeves and gobs of lace.

*Deep breathe*  Oh, I'm not done yet.

The lace started life as 4" wide embroidered scallop eyelet lace that I split down the center for this project, minutely gathered and applied to every edge. The skirt is 3 yards wide and will be gathered down to fit a flat 25" waistband!

*Whew* so there you have it. The secrets of the Lolita Outfit ;) It's starting to look like something one of Yve's dollies would wear huh? More pics soon!

Blog Widget by LinkWithin