Showing posts with label skirt. Show all posts

Monday, July 1, 2013

Create 365 - 148 to 161

Okay, so, due to things that could not be controlled (migraines, my scattered creativity, an over-thinking brain and a bit of squashed hope) I am obviously way behind posting. I have been creating though! Here's what I've worked on during my blogging absence:

Day 148
Swirly wall switch.

Looks much better than they ugly, cracked thing that it originally was.

Day 149
Here is a Daisy Circle Skirt.

Oh wait, there is no pic yet because I wore it already and now it's in the wash. As soon as it is laundered and ironed I'll add it in. You'll just have to take my word on it.

I made another skirt for myself, hurray! I keep seeing cute skirts and dresses but so many are too short for my taste. I prefer knee-length or longer, thanks. I just don't want to be getting "friendly" with all the town every time I bend over, ya know?

Day 150 to 156
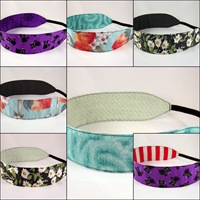
Seven new limited edition reversible headbands.

Headband9

Top: Kittens and Cobwebs, Peaches and Screams, Pushing Up Daisies
Mid-Left: Peach Dreams
Bottom: Daisy Chain, Sweet Zombie, Candy Kittens

Click the pic to go see all 32 of the LE headbands I currently have available.

Day 157 to 161
Dahlia Barrettes, one of which which will be given away soon in celebration of breaking 900 on my shop's Facebook page!


It looks like I lost a little over a week's worth of creating but it couldn't be helped so I'll just soldier on. Hopefully I can keep up with my 365 a little better now and not take 2 years to finish it! We shall see, we shall see.

xx ~Static

Thursday, June 6, 2013

Create 365 - Day 143 to 147

I haven't been able to post daily, obviously, but I'm still going with my 365! Here are the latest additions...

Day 143
Here's the finished draft of the Bodice Front of the base pattern pieces I've been working on for myself. I forgot how involved this part was! I even started over at one point instead of backtracking a mistake. Whew! I was a bit rusty but I got my groove back.

Day 144
Here are some Circle Skirt drafts. They could be used as two different sized skirts but together they are the front and back for a 50s style swing dress.

Day 145
Circle skirt! Peachy, isn't it? I couldn't resist. I need more fun circle skirts in my wardrobe. They're very versatile, casual or dressy depending on what you wear them with, and just plain cute.
I tried to snap a pic of me wearing it but the lighting was horrible. Maybe another time. Seeing it on a hanger just doesn't do it justice.

Day 146 & 147
Two more Grumpy Nekos for the lovers of grumpy cats everywhere.

xx ~Static

Saturday, January 15, 2011

MrsEvils' Me Equivoque Contigo Dress - Pt 2

So, after making all my adjustments to the pattern (MrsEvils' Me Equivoque Contigo Dress - Pt 1 can be found here) I decided to change the casing on the boning. For one, plastic boning typically comes in bulky white casing. "But, Static", you ask, "it's on the inside so who will know?" Me, that's who!

I decided to use single fold black bias tape instead since it will be sandwiched between the outer cotton fabric and satin lining. Stable enough without all the bulk. Excellent. There is a little trick to it though. Cut the black bias tape in the lengths directed in the pattern. On one end, only, of each piece mark 3/8" up from the end and stitch straight across. Put the casings aside for later. You won't put the boning in the casings until after the casings are sew in place as directed in the pattern.

Oh, and if the plastic boning is curling up on you iron it to flatten it out. Use a low heat (my iron was on 1), you don't want to melt it. Place it on your ironing surface so that the curve of the plastic boning is bulging up toward you. Place the iron at center, while holding one end up so your bending that pesky curve in the opposite direction, then pull.Yes, pull the boning upward from under the flat iron. Do this a couple times until it straightens enough and then repeat for the other end. Remember to lift your iron occasionally so you don't burn your ironing surface! Just another reason to have your iron on LOW.

MrsEvils-InProgress3

Hopefully the above tips haven't bored you to tears. For being so wonderful here's a sneak peek of the dress! I've cut all the pieces and pinned them to my dressform to double check that they line up the way that I wanted.

MrsEvils-InProgress1 MrsEvils-InProgress2

The pieces are just overlapped without the seam allowance tucked in. The top edge will drop a bit and the hem will come up 1.25". Time to cut the gorgeous red lining then sewing! Hurray!

Pt 3, coming soon...

Thursday, January 13, 2011

MrsEvils' Me Equivoque Contigo Dress - Pt 1

~or~ How to turn McCall's 4450 pattern into an asymmetrical (short in front long in back) dress!

This is the first time I've drafted an asymmetrical dress. Mind you, I understand the concept. But knowing and doing are different dragons. So I hunted the interwebs for drafting tips but I could only find a couple of mentions of dresses with trains, which while close don't quite have the shape I was looking for, and the odd lopsided skirt. So dusting off the drafting knowledge I've squirreled away in my brain I just went with what looked right to me.

Keep in mind MrsEvils is adorably pocket-sized. Okay, MrsEvils is not all that much smaller than me but she is adorable. How could you not want to put her in your pocket? Alright I better stop before she kicks my butt ;D

I sent her here a rainbow of color options but she decided on red lining to go with the awesome fabric she sent me. Red. Deliciously bloody red. Ahem, err, excuse me. Here's the red color mockup:
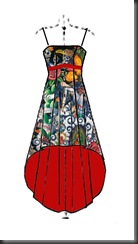
MrsEvilsDress-ColorMockup-FINAL

There were a few tweaks to the M4450 pattern but I'm going to focus on the asymmetrical skirt portion here.

4450Pattern1

Before you ask, the pattern  pieces might look odd because 1) I don't reinvent the wheel when I'm surrounded by mounds and mounds of collected patterns and 2) I snip & tape back the edges so I can use the patterns other sizes. Sneaky me. And the crappy pics are because they were quick snaps as I was working in the wee hours of the night. I was busy, okay? Jeez. Anywho, for quick reference, since I'm going into seamstrix mode here in a sec: CF = center front, CB = center back, SS = side seam, WL = waistline, hem edge =  finished hem + 1.25" hem

Starting with the CF piece I measured down from the waistline and made a perpendicular line (pink chalk line) where the new hem edge was going to be.
4450Pattern2
Then I went to the CB piece. At the center back seam I marked a perpendicular line across the bottom of the pattern at the level of the new back hem edge.
4450Pattern3
Now to get the angled line between the two I subtracted the finished hem length of CF from CB. This is now my SS length.
Of course the one time I need seam allowance marks they're not on the pattern. Figures. So I marked the 5/8" seam allowance, between waist and hem, on all pieces and then pinned them together.
Next, at the SS, I measured down from the WL and made a small mark for the new SS hem edge.
On the new CF hem edge line I made a mark about 6" from the CF. Using a big metal ruler, I connected that mark to the SS mark and then continued the line until it hit the horizontal line I drew on the CB piece.
Now what to do with this big old zigzag? I use a varied form curve (like a french curve but a lot bigger) to smooth out the zig on the CF piece. Easy. The trickier part is the zag on the CB piece. For the CB I just used my elbow as a fixed point and swung my hand back and forth to lightly chalk a curve inside the zag (my old drafting teacher is probably having heart palpitations right now). I used my varied form curve to make sure it connected smoothly and drew the line in stronger using the varied form curve as a guide.
4450Pattern4
I briefly pinned it to my dressform to double check that I liked the shaped of the new hem, the pink chalk made it easy to see whether looking at the right or wrong side of the pattern. Yup, good. Time to cut! I'm hopeful that I'll need the pieces that I cut away so I was sure to write on each as to what pattern piece they corresponded to so I could always tape them back in place.
4450Pattern5 
I made sure to get ALL of the pins out of the pattern pieces, gave them a quick press and...

To be continued!

Wednesday, April 8, 2009

Altered Starr's... Pants to a Skirt

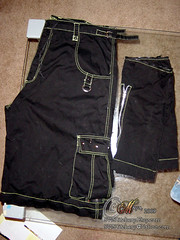
I did a pants to skirt alteration for StarrlightJewelry and let me tell you it was daunting! The very-popular-but-shall-stay-nameless company that made the pants must have designers/pattern makers that come up with these things while their heads are in the clouds (or in darker more unpleasant places). They were raver type pants with lots of buckles, pockets and zip-off lower legs:

The waist needed to come in at least 4" but the fullness came in handy to make a nice flared skirt. Because of the, hmm, interesting cut and sewing of these pants I wound up having to take off the waist band, unstitch half of the cargo pockets (to get at the side seams), belt loops, waist band side buckles, the inner leg seam and hem. Oh and I removed and tossed the drawstring. Yes, there was a drawstring, that only pulled in the front of the pants, which is not flattering on any of our species.

I then opened up and flattened out the front and back pieces (you can Google "jeans to skirt" and find lots of instruction if interested), took in and re-curved the side seam hip, adjusted back darts...

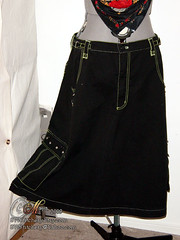
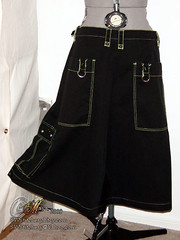
After a lot of time, and much patience on Starr's part, we finally have this:


A lovely A-line flared skirt that will fit, tada! No drawstrings allowed. Another odd element from the original pants design made the back longer than the front. I decided to leave it that way because it works for the skirt, looks good on and, well, round booties tend to pull up the back of a skirt anyway ;)

Blog Widget by LinkWithin