Here are the instructions on how to make the inexpensive bookmark/tea light/candy favors I came up with for my Celtic themed, after-wedding, sort-of-reception party.
Something like this would also be great for any type of party, especially if there is a theme. Just change the charm & colors to match the theme such as orange & black with bat charms for Halloween, or mix & match bright colors for a Mad Hatter Tea Party!
♦♦♦♦ ♦♦♦♦ ♦♦♦♦ ♦♦♦♦
Ingredients to make 36 party favors:
♦ 36 green chiffon circles*
♦ 180 iridescent wrapped fondant mints (about 2 bags)*
♦ 36 Vanilla and Mocha Java scented tea light candles in Ivory (from WorthySoyCandles.Etsy.com, best soy candles evah!)
♦ 24yds of 1/4" Ivory satin ribbon**
♦ 36 asst'd silver heart charms*
♦ 36 silver-toned jump rings*
♦ 2 sheets of white cardstock** & color printer
♦ 1 roll of Glue Dots**
♦ Scissors & patience ~or~ a 1.5"W circle punch
♦ Emery board/fine sandpaper
♦ Lighter
♦ Rubberband (optional)
[I got most of my supplies from *OrientalTrading.com and **Hobby Lobby. Coupons found on RetailMeNot.com made this even cheaper!]
♦♦♦♦ ♦♦♦♦ ♦♦♦♦ ♦♦♦♦
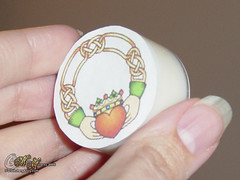
First I printed up a batch of claddaghs (www.aon-celtic.com) on white cardstock to cover the bottoms of the tea lights (you'll see why further down). I fit as many of the images as I could in Photoshop on an 8.5 x 11 sheet.
I used a tea light to draw a light circle around each claddagh and then cut them by hand. Use an emery board or fine sandpaper to smooth out any odd edges.
Use the Glue Dots to stick the claddaghs to the bottom of the tea lights.
Alternately, Microsoft Word should have a sticker template you can use or download. It needs to be 1.5" across to fit a WorthySoy tea light. You could probably print on sticker sheets but I was doing this on the cheap so that was out. And if you have a 1.5" circle punch it will save you time. But again keeping cost down I resisted the temptation to buy one.
Next, cut 36 lengths of ribbon, 24" long each for the bookmark/favor ties. Melt the ends of the ribbon a bit with a lighter. It'll make it easier to thread the charm onto the ribbon and keep the ends from fraying.
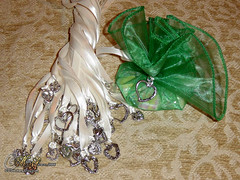
Open a jump ring, thread on a charm, close the jump ring. Fold a length of ribbon in 1/2, put the loop end through the jump ring, then draw the two tail ends through the loop and pull snug. Do this 35 more times. You know have ribbon to tie your favors with that double as bookmarks!
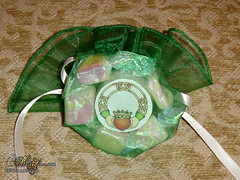
Take one chiffon circle and put 1 tea light & 5 fondant mints (I only ate one I swear) in the center. Gather up the edges of the circle.
Take one ribbon bookmark and wrap it around the chiffon you have gathered up and tie in a half knot opposite to the charm. Even out the chiffon and tie the ribbon in a nice bow.
Here is where the optional rubberband can come in handy, especially if you are doing these without extra helping hands. Put the rubberband loosely above where you will tie the ribbon. Add your ribbon bookmark, tie the bow and then remove the rubberband.
And that's it, now just do it 35 more times! ;D
View from the bottom, because you KNOW people have to at least turn it over to see what's in it before they open it. Just in case there's eye of newt or sommat in it? I dunno. The iridescent wrappers on the fondant mints shimmers nicely through the chiffon.
Wad o' bookmarks & a finished party favor!
It is much easier if you have someone helping you with these, unlike myself that was a one woman mad whirlwind two months before my wedding. My theme song just before my wedding and party was "They're Coming to Take Me Away" (by Dr.Demento) because I did pretty much everything myself. Thank goodness we got married at the courthouse.
If you're going to do these for your wedding reception maybe add this to the list of activities for your wedding shower. Get those girlfriends to help you!
© Claddagh art by www.aon-celtic.com
All other content ©2008 Maya/Static White/Static White's Stitchery
Link back to this to your heart's content but please do not copy and paste my content! I worked hard to put this together. Give credit where credit is due.








0 comments:
Post a Comment